

Part 2 of 2: Sample implementation of the UI with popup pattern
In lots of my OutSystems projects I came across master-detail data structures. In this two-parted article, we’ll explore an efficient approach to manage master-detail data structures in OutSystems projects.
In part one we already created the core service to handle purchase orders and their related order items. In this second part, we’ll delve into designing the user interface and introducing a pattern for editing sub items (here: order items) via a popup dialog.
What you need
If you want to follow up the implementation on your own, you need:
- An OutSystems account (a free personal environment is sufficient)
- OutSystems Service Studio
- The sample core service implemented in part one:
This tutorial is also suitable for OutSystems newcomers. However, a little prior experience in using the Service Studio is useful.
Introduction
Understanding the challenge
In part one of this article, we dug into the intricacies of master-detail structures and how they often come with unique consistency requirements. These requirements can present challenges when dealing with detail records (child elements) that are intricately linked to their master records (parent elements). In the realm of user interface (UI) design, an essential question arises: how can we create child elements if the parent element doesn’t exist within the core service, yet? This issue becomes particularly pertinent when dealing with compositions, where the core service must ensure the absence of “empty” parent elements, such as purchase orders without associated order items. To address this challenge, in part one, we have already implemented a core service that exclusively provides access to purchase orders along with their associated order items as a cohesive composition.
Designing the user interface
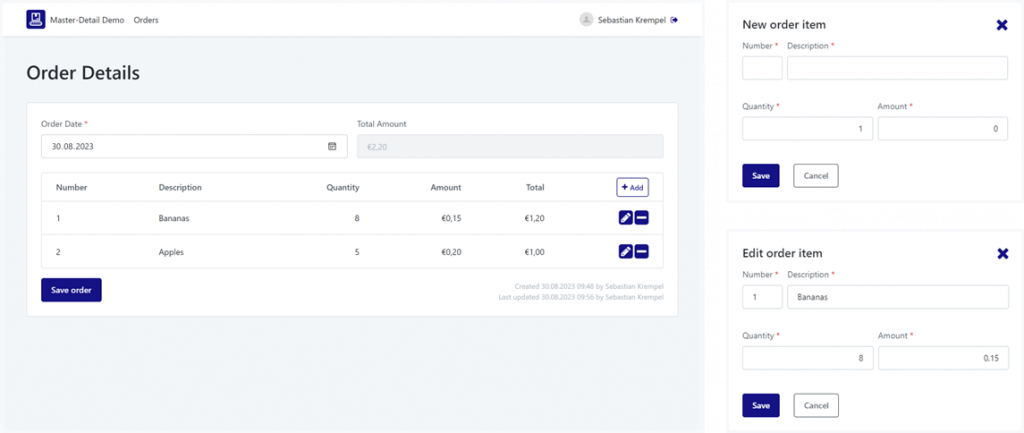
Our primary objective is to craft a user-friendly screen that seamlessly presents a single purchase order, complete with its header information and a tabular representation of all associated order items. This interface should empower users to perform a range of actions with ease, including:
- Modifying the order date.
- Adding new order items via a dedicated “Add” button.
- Editing existing order items through an intuitive pencil icon.
- Removing order items via a distinct icon.
Importantly, all these changes should remain pending until the user explicitly clicks a “Save order” button. Additionally, we aim to streamline the process of creating new orders directly through the same screen.
To realize this vision, I have conceptualized the following layout, complemented by a popup dialog for entering or editing order items:
Implementation
Creating the basic detail screen
Our journey begins with the foundation of a Reactive Web App template, to which we add a dependency on the core service Order_CS introduced in the preceding part of this article.

To construct the detail screen, let’s follow these steps:
- Generate a new blank screen, naming it Order. This screen will serve as the canvas for displaying and manipulating purchase order details.
- Add an optional input parameter called OrderId of type Order Identifier. This parameter will facilitate passing the order’s ID to the screen for displaying existing orders or leaving it blank to create new ones.
- Add a boolean local variable named IsSaving. This variable will be used to animate the save button during the saving process, providing a visual cue to the user.
- Create a data fetch action named GetOrder responsible for loading the specific purchase order. Change its output parameter Out1 to OrderDetails and set the data type to Order_Detail.
- Last add a client action named SaveOnClick to handle user interactions with the “Save” button. This action will trigger the saving process for the entire purchase order by invoking the relevant server actions. To facilitate this, we’ll need a local variable named OrderSaveItems, structured as a list of type Order_Save_Item.
Certainly, let’s proceed with adding the essential UI components to our detail screen while ensuring proper integration with OutSystems integrated validation:
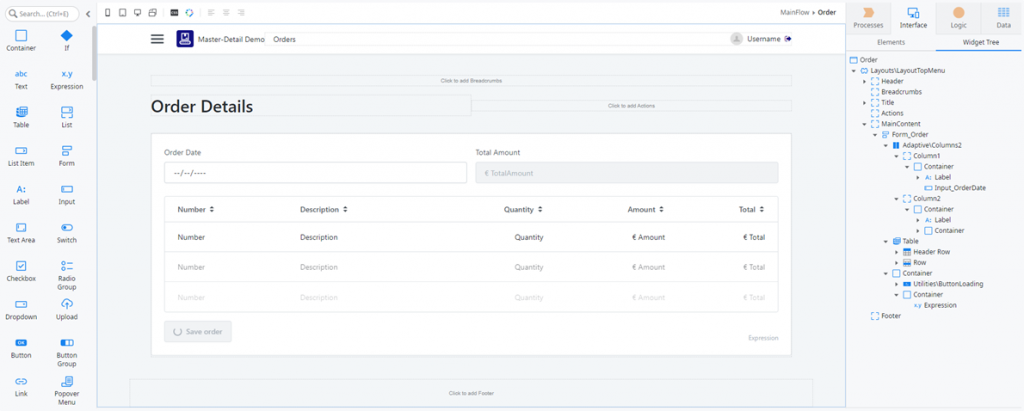
- Begin by adding a form element called Form_Order. This form must encompass all the relevant input controls and the “Save” button for the built-in validation to work properly.
- Adding the text input for the order date and the table of order items is straight forward. Just bind the parameter Variable of the text input to
GetOrder.OrderDetails.OrderDateand the Source of the table toGetOrder.OrderDetails.OrderItems. - The expressions in the table cells can be bound to the respective attributes of
GetOrder.OrderDetails.OrderItems.Current. - Following the table, insert a container with the Style Class set to
"margin-top-base display-flex align-items-flex-end". This container will serve as a visually appealing section for the “Save” button and display of relevant information such as when the purchase order was created and last updated.
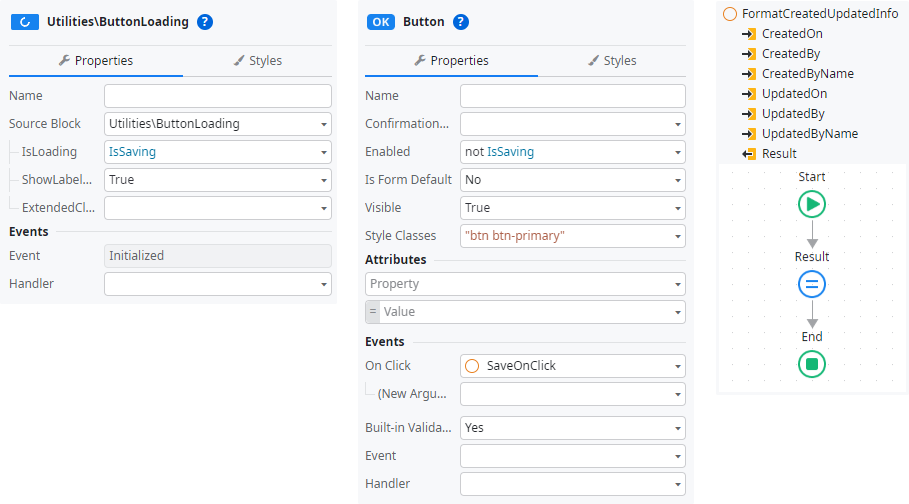
- For the “Save” button, we’ll enhance its functionality by adding the ButtonLoading control instead of a normal Button. The property IsLoading is to be bound to the local variable IsSaving.
- To prevent users from clicking the button multiple times, we want to disable the button within the ButtonLoading control while saving is in progress by binding its Enabled property to
not IsSaving. - Assign the SaveOnClick action, which we previously created, as the On Click event handler for the “Save” button.
- Regarding the display of created and last updated information, we implement a client action on the Logic tab with Function set to Yes and assigning the following expression to the output parameter Result:
If(CreatedOn <> NullDate(),
  "Created " + FormatDateTime(CreatedOn,"dd.MM.yyyy HH:mm") + " by " +
  If(CreatedByName = "", "[Deleted user " + CreatedBy + "]", CreatedByName) + NewLine() +
  "Last updated " + FormatDateTime(UpdatedOn,"dd.MM.yyyy HH:mm") + " by " +
  If(UpdatedByName = "", "[Deleted user " + UpdatedBy + "]", UpdatedByName)
, "")- This new client-side function can then be used in the expression component on the screen.
Adding a popup dialog to manipulate order items
As outlined in the introduction, we want to enable the user to add and change order items through a popup dialog. For controlling this popup we need various local variables and client actions. Here I want to share a slim tried-and-tested solution pattern, refined through my prior project experiences:
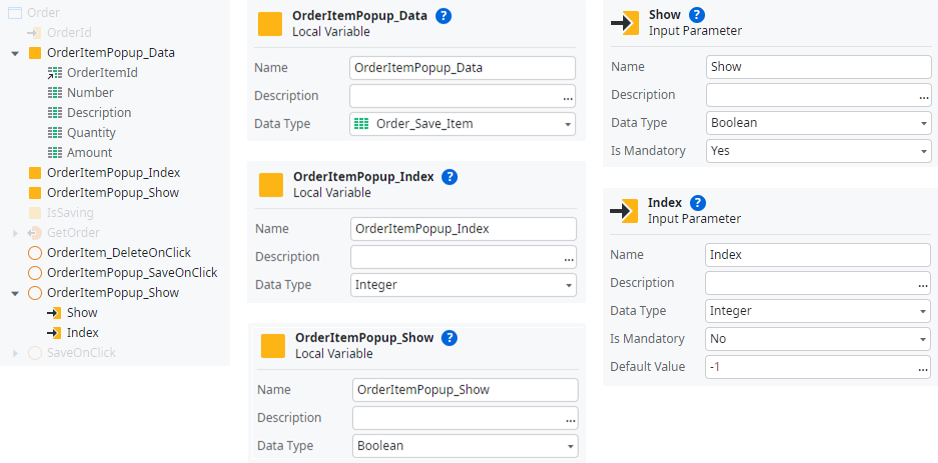
- OrderItemPopup_Data
This variable stores the data of the currently opened order item in the popup dialog, utilizing the structure Order_Save_Item.
💡 TIP
In cases where you need to display item data that cannot be manipulated and, therefore, is not part of the _Save structure, consider reusing the _Detail structure instead. However, keep in mind that you’ll need to assign all relevant data to the respective attributes when opening the popup and update dependent data if changes occur in the popup inputs.
- OrderItemPopup_Index
Holds the index of the currently opened order item (-1 for new items to be created). - OrderItemPopup_Show
Is a boolean variable that controls the visibility of the popup dialog.
While we will implement the following actions in detail later, it’s beneficial to create them in advance for a clear code structure and allows us to directly assign them on creation of the related UI components:
- OrderItem_DeleteOnClick
Is responsible for removing order items on the client side. - OrderItemPopup_SaveOnClick
This action handles the click event of the “Save” button within the popup dialog and manages the writing back of entered data. - OrderItemPopup_Show
Acts as a helper method to initialize and control the popup dialog. It accepts two input parameters: Show to determine whether to display or hide the popup and an optional parameter Index for specifying which order item to open.
By structuring and naming your solution in this manner, you’ll establish a clear and organized framework for handling order items and the related popup dialog.
Next, we have to add the UI components for the popup dialog as well. For the sake of efficient validation, the popup contains a separate own form. In OutSystems, forms cannot be nested, so it’s crucial to place the Popup Dialog component in MainContent after and not into Form_Order.
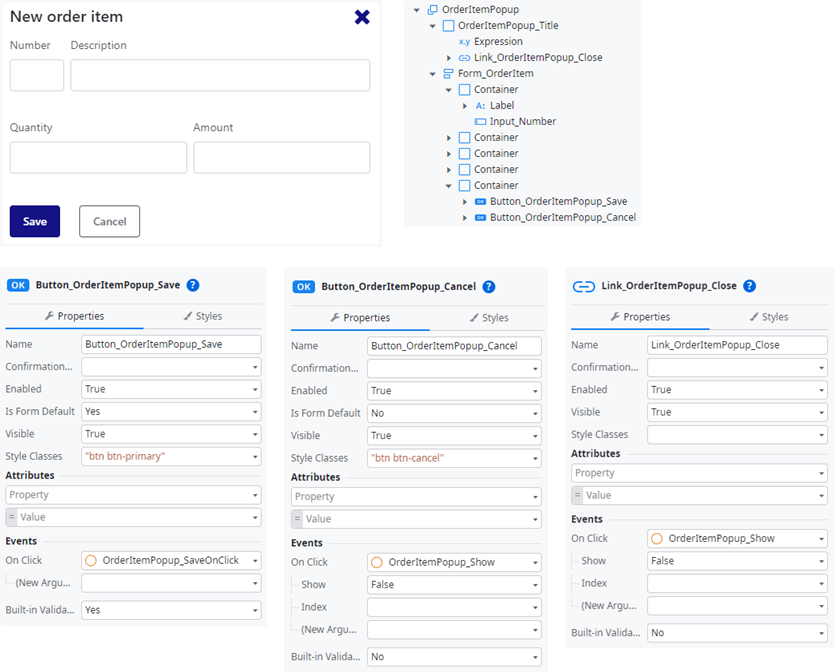
The popup UI consists of two essential components:
- OrderItemPopup_Title
This dynamic element features an expressionIf(OrderItemPopup_Index = -1, "New order item", "Edit order item")to display a title text and a link element to close the popup by calling OrderItemPopup_Show with the parameter Show being set to False. - Form_OrderItem
allows users to manipulate the currently open order item.
To ensure an organized layout, the various input fields of the form are placed within containers. Their size and floating are simply controlled by adjusting the Width property on the Styles tab, aligning with a suitable number of columns.
- For the data connection, the input fields are directly bound to the corresponding attributes of OrderItemPopup_Data.
- To allow the user to commit changes made, there is a “Save” button placed in the last container. By setting Is Form Default to Yes, this button serves as the form’s default action. As you guess, the On Click event is send to OrderItemPopup_SaveOnClick. To ensure the Built-in Validation is utilized set it to Yes.
- Additionally, a “Cancel” button is placed adjacent to the “Save” button, providing users with the option to discard changes. Similar to the close link in the popup title, clicking this button invokes OrderItemPopup_Show with the parameter Show being set to False. In this case, Built-in Validation is set to No allowing for a straightforward cancellation of actions without validation checks.
To complete the UI, we need to add an additional column to the order items table. This new column houses a button and the icons for adding, editing, and removing order items.
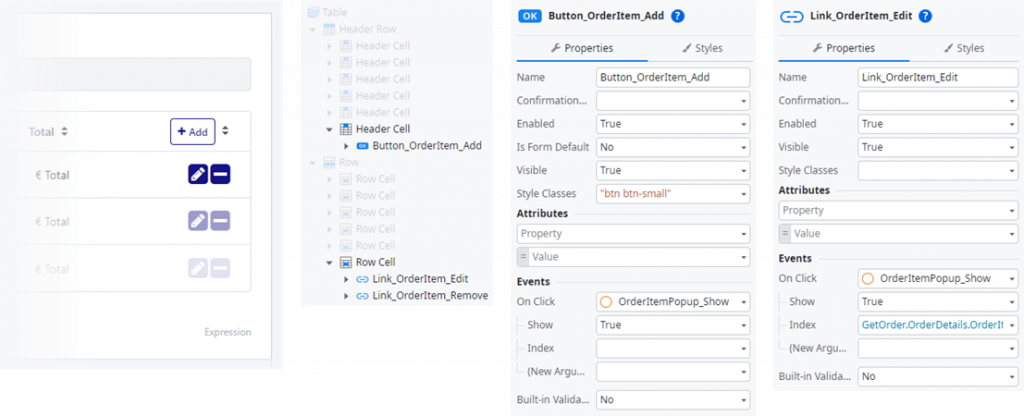
- In the new header cell, we place the button Button_OrderItem_Add. On click we simply call OrderItemPopup_Show with Show is True to display the popup dialog, Index is left blank so the default value -1 is used to indicate a new order item is to be created.
- In the new row cell, we add the two icons, one for editing and one for removing the individual order item.
- By right clicking the edit icon, we can link it to OrderItemPopup_Show. Obviously Show has to be True but this time also Index is filled with
GetOrder.OrderDetails.OrderItems.CurrentRowNumberto open the popup dialog and load the current order item. - Finally, the delete icon is linked to OrderItem_DeleteOnClick.
Implementing the logic
With all UI components in place, it’s now time to implement the corresponding logic.
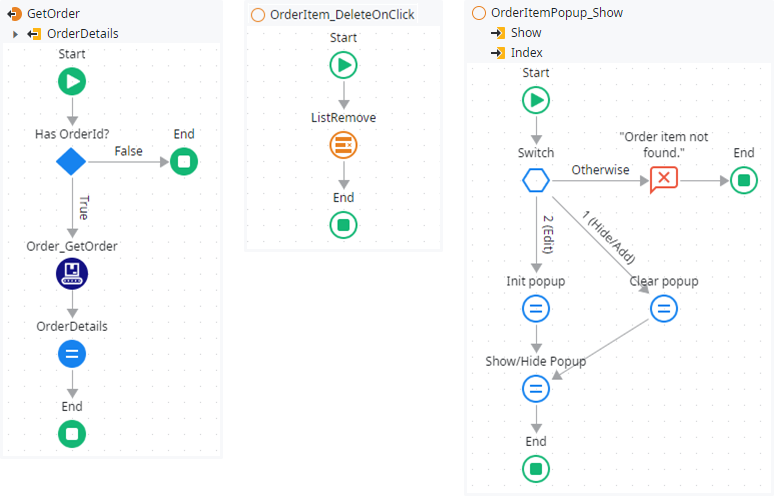
- GetOrder
The logic begins with this fetch action, responsible for loading the purchase order by calling Order_GetOrder of the core service. The fetched result is then assigned to the output parameter OrderDetails. However, to avoid unnecessary calls to the core service, the action is directly aborted if the screen input parameter OrderId is null. - OrderItem_DeleteOnClick
removes the current order item from the formerly fetched listGetOrder.OrderDetails.OrderItemsby calling ListRemove for PositionGetOrder.OrderDetails.OrderItems.CurrentRowNumber.
The third action, OrderItemPopup_Show holds the magic for controlling the popup dialog and operates as follows:
- In the first switch branch, it checks whether the popup should be hidden or shown add a new order item. Specifically, it verifies
not Show or Index = -1and if the condition is met, all attributes of OrderItemPopup_Data are reset to their initial values. - In the second switch branch, the condition
not GetOrder.OrderDetails.OrderItems.Empty and Index ≥ 0 and Index < GetOrder.OrderDetails.OrderItems.Lengthis checked to verify, Index is in the list range of existing order items. If met, the popup data is initialized by assigningGetOrder.OrderDetails.OrderItems[Index]to OrderItemPopup_Data. - Finally, the action shows or hides the popup dialog by assigning the input parameters Index and Show to OrderItemPopup_Index and OrderItemPopup_Show.
- In case none of the conditions are met, it means Index is out of bounds, and an error message is displayed.
What’s now missing is handling clicks on the “Save”-buttons:
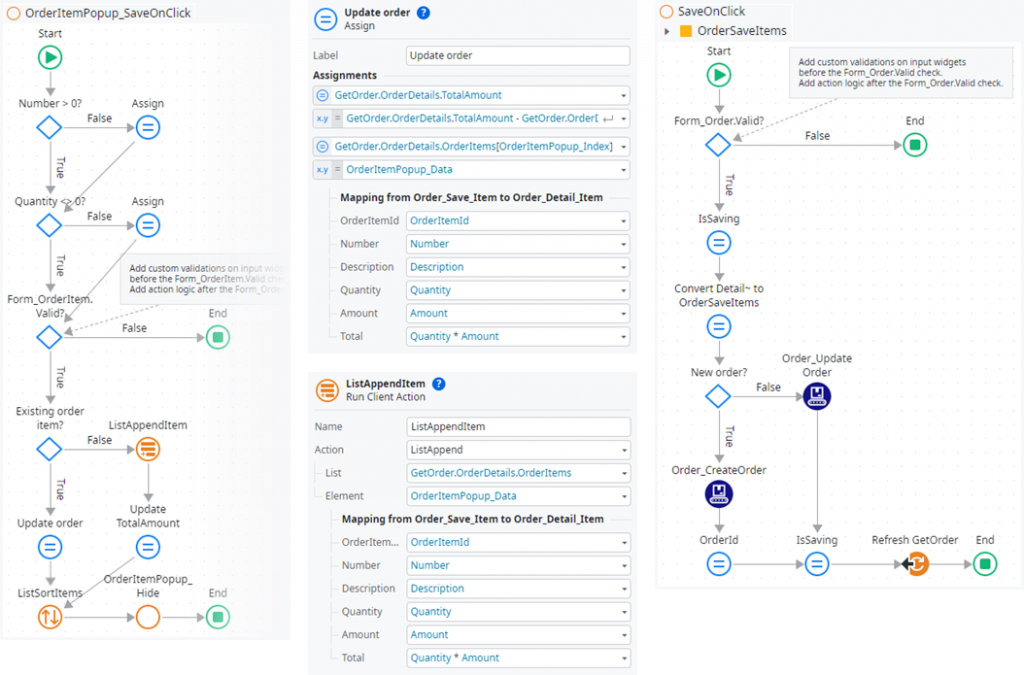
Let’s beginn with the popup dialogs “Save”-button by implementing OrderItemPopup_SaveOnClick. To leverage OutSystems’ built-in validation, we follow best practices outlined in the documentation. If the form is valid, we proceed as described in the following breakdown.
- By checking
OrderItemPopup_Index <> -1we determine whether we’re updating an existing order item or creating a new one. - To update an existing item, we first must recalculate the TotalAmount with the formula
GetOrder.OrderDetails.TotalAmount - GetOrder.OrderDetails.OrderItems[OrderItemPopup_Index].Total + (OrderItemPopup_Data.Quantity * OrderItemPopup_Data.Amount)before we can assign the updated values in OrderItemPopup_Data toGetOrder.OrderDetails.OrderItems[OrderItemPopup_Index]. - On the other hand, for creating an order item we can simply append a new entry with the entered values in OrderItemPopup_Data to the list GetOrder.OrderDetails.OrderItems and afterwards recalculate the TotalAmount with the formula
GetOrder.OrderDetails.TotalAmount + (OrderItemPopup_Data.Quantity * OrderItemPopup_Data.Amount). - Following the update or addition of the item, we use ListSort to reorder the order item list accordingly.
- The action concludes by hiding the popup with OrderItemPopup_Show passing in False for the Show parameter.
The action SaveOnClick is the final piece of functionality to be implemented. The beauty of this pattern lies in its client-side nature, which ensures that no data changes are made on the server until the user actively saves their changes. Consequently, there’s no need for temporary data storage on the server, and no dependency issues arise.
This client-centric approach empowers users to freely manipulate the master and detail data without affecting the core service at all.
- It’s important to ensure entered data is valid before proceeding. Thus, the action begins with the validation of the Form_Order.
- To disable the “Save” button and show its loading animation, we set the local screen variable IsSaving to True before the processing begins.
- On the client side, all data is held in the Order_Detail structure and its sub-structure Order_Detail_Item. However, to persist changes using the core service, the data must be converted to Order_Save and Order_Save_Item structures. OutSystems handles automatic conversion between structures where possible, but manual mapping may be necessary. This is especially true for substructures of a list type.
This is the reason for assigning the list of order items to a temporary variableOrderSaveItems = GetOrder.OrderDetails.OrderItemsin the flow element Convert Detail~ to OrderSaveItems. - Persisting the changes on the server side is invoked for an existing purchase order by calling Order_UpdateOrder, and for a new one by calling Order_CreateOrder. For new purchase orders, also the screen input parameter OrderId is updated with the newly created ID.
- After saving is complete, IsSaving is reset to be False.
- Finally, refreshing the fetch action GetOrder ensures the most recent data version is loaded again.
With these steps, your demo application is ready to be published and tested. It follows a client-centric approach, ensuring that server data remains consistent and unchanged until the user explicitly saves their modifications, providing a seamless and efficient user experience.
Hopefully, I succeeded in presenting my pattern for loading and saving nested data structures along with the use of popup dialogs for those structures. I am delighted if you liked the article and if you can adapt the pattern to your own applications. Happy coding with OutSystems!
I would be pleased if you follow me on my social media accounts. In case you have any questions left open or have tips for me to improve, please contact me via Medium or my OutSystems profile.