

Part 1 of 2: Sample implementation of the core service
In lots of my OutSystems projects I came across master-detail data structures. In this two-parted article, we’ll explore an efficient approach to manage master-detail data structures in OutSystems projects.
As a sample app, we’ll create a core service to handle purchase orders and their related order items. Part one of this article will focus on setting up the core service, while part two will delve into designing the user interface and introducing a pattern for editing sub items (here: order items) via a popup dialog.
What you need
To follow along with this implementation, you’ll need:
- An OutSystems account (a free personal environment is sufficient).
- OutSystems Service Studio.
This tutorial is also suitable for OutSystems newcomers. However, a little prior experience in using the Service Studio is useful.
Introduction
Understanding the challenge
In OutSystems projects, dealing with relational data models is a common task. A quite frequent structure is aggregations or compositions in particular. These lead to master-detail structures like for example purchase orders with associated order items. Here often consistency requirements come into place. E.g. when creating new data records in the database, detail records (child elements) can only be created after the identifier of the master record (parent element) is known.
Designing the core service
The primary objective of a core service is to store data related to a specific core concept. Depending on the project’s complexity, it may be advisable to create a business logic module atop the core service to implement more intricate business rules or orchestrate data access that spans multiple core services. For the purpose of this article, we’ll use a simple order core service, named Order_CS, to demonstrate the pattern. This core service can later be directly accessed by consumers, such as the user interface we’ll construct in part two of this article.
Database
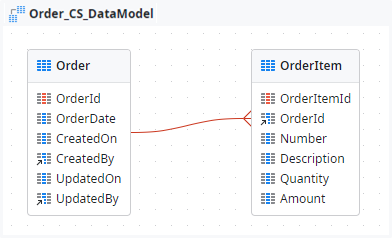
In OutSystems, the most straightforward method to store data is by utilizing the platform’s built-in relational database. When dealing with master-detail structures, such as a purchase order and its associated order items, you can model this relationship with a simple one-to-many relationship in the database. For our purposes, we need two entities:
- Order
This entity represents the purchase order itself and contains essential header information like the order date. - OrderItem
Use this entity to store the corresponding order items, linked to the OrderId.
In a real-world application, you would likely include additional attributes and establish relationships with other entities, such as products. However, for this sample app, the simplified model described above should suffice.
/**
 * @entity Order
 * Purchase order
 * Public: No
 *
 * @attribute {Text} OrderId
 * Id of the purchase order
 * Length: 36
 *
 * @attribute {Date} OrderDate
 * Date of the purchase order
 *
 * @attribute {Date Time} CreatedOn
 * Timestamp of creation
 *
 * @attribute {User Identifier} CreatedBy
 * User who created the record
 * Delete Rule: Ignore
 *
 * @attribute {Date Time} UpdatedOn
 * Timestamp of last update
 *
 * @attribute {User Identifier} UpdatedBy
 * User who last updated the record
 * Delete Rule: Ignore
 */

/**
 * @entity OrderItem
 * Item of a purchase order
 * Public: No
 *
 * @attribute {Text} OrderItemId
 * Id of the order item
 * Length: 36
 *
 * @attribute {Order Identifier} OrderId
 * Order the item belongs to
 * Delete Rule: Delete
 *
 * @attribute {Integer} Number
 * Order item number
 *
 * @attribute {Text} Description
 * Description of the order item
 * Length: 50
 *
 * @attribute {Integer} Quantity
 * Ordered quantity of order item
 *
 * @attribute {Currency} Amount
 * Amount of order item per unit
 *
 * @index UX_OrderId_Number
 * Number must be unique per purchase order
 * Unique: Yes
 * Attributes: OrderId, Number
 */
In the code block below, you’ll find specific database configurations:
- Data type for identifiers:
Both OrderId and OrderItemId use a Text data type with a length of 36. This choice aligns with the use of GUIDs as identifiers. - Delete rule for external relations:
The delete rule for attributes CreatedBy and UpdatedBy is set to Ignore. This decision is made because the data type User Identifier generates a foreign key constraint to the system entity User. Other options like Delete or Protect would pose problems when attempting to delete frontend accounts in the user provider. Broken references possibly caused through Ignore, on the other hand, can be handled within the own application. - Delete rule for fully dependent, internal relations:
For the attribute OrderId in the OrderItem entity, the delete rule is intentionally set to Delete. This setting ensures that all order items associated with a purchase order are automatically deleted when the purchase order is deleted, as they cannot exist independently. - Additional unique index:
The index UX_OrderId_Number, visibly denoted as unique with the prefix UX, enforces that each order item number can only appear once within the same purchase order. It ensures uniqueness and data integrity.
Public interface of the core service
You may have noticed that the entities in our configuration are not set as public. It’s a common practice to expose entities publicly, often in a read-only mode. This approach offers the advantage of controlled data writing through actions within the core service, while still permitting free usage in other modules for selection purposes, such as in joins.
However, for our demo application, we’re taking a different approach. We aim to provide read access to the data only in a controlled manner. This means that external modules will have limited access to the data, ensuring that it’s handled and manipulated as intended.
Server actions (CRUD operations)
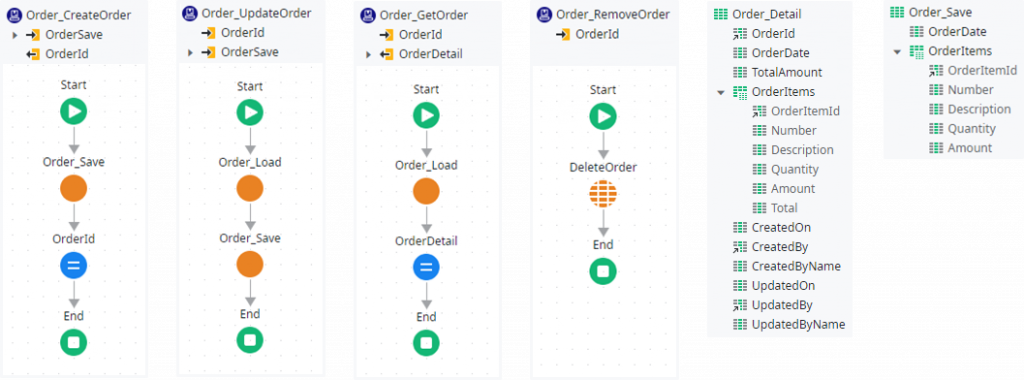
In our implementation, you’ll find public server actions that cover all fundamental CRUD (Create, Read, Update, Delete) operations for purchase orders. These actions, tailored to their respective functions, expect or provide input/output parameters structured as OrderId, Order_Detail, and Order_Save.
Typically, public exposed actions would include an authorization check as the first step. For the sake of simplicity, this article omits that step.
💡 TIP
To enhance clarity and workflow within your application, consider using custom icons for public actions. This makes it easier to distinguish them from private actions and locate them within the flow of other modules.
Detail structure (Order_Detail)
The Order_Detail structure defines the detailed information of a single purchase order. It is designed to be retrieved by other modules using the core service. This structure allows for a clear representation of the purchase order’s details, facilitating its utilization within your application.
/**
 * @structure Order_Detail
 * Details of a purchase order
 * Public: Yes
 *
 * @attribute {Order Identifier} OrderId
 * Id of the purchase order
 *
 * @attribute {Date} OrderDate
 * Date of the purchase order
 *
 * @attribute {Currency} TotalAmount
 * Total amount of all order items
 *
 * @attribute {Order_Detail_Item List} [OrderItems]
 * Items of the purchase order
 *
 * @attribute {Date Time} CreatedOn
 * Timestamp of creation
 *
 * @attribute {User Identifier} CreatedBy
 * User who created the record
 *
 * @attribute {Text} [CreatedByName]
 * Name of user who created the record
 *
 * @attribute {Date Time} UpdatedOn
 * Timestamp of last update
 *
 * @attribute {User Identifier} UpdatedBy
 * User who last updated the record
 *
 * @attribute {Text} [UpdatedByName]
 * Name of user who last updated the record
 */

/**
 * @structure Order_Detail_Item
 * Order item details of a purchase order
 * Public: Yes
 *
 * @attribute {OrderItem Identifier} OrderItemId
 * Id of the order item
 *
 * @attribute {Integer} Number
 * Order item number
 *
 * @attribute {Text} Description
 * Description of the order item
 *
 * @attribute {Integer} Quantity
 * Ordered quantity of order item
 *
 * @attribute {Currency} Amount
 * Amount of order item per unit
 *
 * @attribute {Currency} Total
 * Total amount of the order item
 */
The _Detail structure, as a general pattern, offers some advantages for managing data objects and their associated sub items:
- Nested structure:
One standout feature is the inclusion of order items as a nested structure within the Order_Detail. This design allows you to request the entire purchase order, including its items, in a single query to the core service. Consequently, there’s no need for additional requests, enhancing efficiency. - Elimination of redundant foreign keys:
Due to the nesting of Order_Detail_Item, the foreign key OrderId is not required at the sub item level. This reduces redundancy and simplifies the structure. - Structured naming convention:
To maintain clarity in the Service Studio, I recommend prefixing nested structures with the parent structure’s name. This naming convention aids in quickly identifying and organizing structures, especially as they are listed alphabetically. It also helps prevent confusion with other structures that might represent the same child object independently of the particular parent structure. - Enhanced convenience:
To improve the user experience and assist consumers of the core service, we’ve incorporated calculated attributes (e.g. totals) and lookup information (e.g. names of users who created and last updated the record) within the structure. These additions enhance the usability and usefulness of the Order_Detail structure.
Save structure (Order_Save)
In a manner similar to the detail structure used for data retrieval, the Order_Save structure encompasses all attributes of a single purchase order that can be modified from outside of the core service. This structure is designed to ensure a comprehensive representation of writable attributes for efficient data management while facilitating the same advantages as the previously described _Detail structure.
/**
 * @structure Order_Save
 * Details of a purchase order to be saved
 * Public: Yes
 *
 * @attribute {Date} OrderDate
 * Date of the purchase order
 *
 * @attribute {Order_Save_Item List} [OrderItems]
 * Items of the purchase order
 */

/**
 * @structure Order_Save_Item
 * Order item details of a purchase order to be saved
 * Public: Yes
 *
 * @attribute {OrderItem Identifier} OrderItemId
 * Id of the order item (Null for new items)
 *
 * @attribute {Integer} Number
 * Order item number
 *
 * @attribute {Text} Description
 * Description of the order item
 *
 * @attribute {Integer} Quantity
 * Ordered quantity of order item
 *
 * @attribute {Currency} Amount
 * Amount of order item per unit
 */
Private server actions
As depicted in the figure above, the flows of the public server actions are relatively straightforward. The actual heavy lifting occurs through the invocation of two non-public server actions: Order_Load and Order_Save. In this section, we will delve into these essential components.
💡 TIP
Employing dedicated server actions for loading and saving orders not only streamlines the code but also enhances maintainability. This separation minimizes redundancy and ensures consistent functionality.
Load data (Order_Load)
The Order_Load server action serves the purpose of retrieving a specific purchase order from the database.

- The action begins by checking if
OrderId <> NullTextIdentifier(). This ensures that in absence of the OrderId required to proceed with the data retrieval, an empty (initial) Order_Detail structure is returned. If desired, default values for the attributes of new orders could also be set here. - The Data is selected using an aggregate that filters records by the given OrderId and joins with the order items from the OrderItem entity. Although we enforce not allowing purchase orders without order items, the join type With or Without is selected to ensure that orders can still be loaded if this rule is neglected.
- Two joins are made with the User entity, once for CreatedBy and once for UpdatedBy. This enables the retrieval of users’ names associated. The Ignore delete rule is set for these two foreign keys to avoid issues with deletion attempts in the user provider. Consequently, the join type With or Without must be selected to avoid excluding purchase orders created or last modified by users who may have been deleted in the meantime. It’s worth noting the assignment of speaking aliases for the user entity, which simplifies later assignments of values.
- If the purchase order is found, the flow continues. Otherwise, a NotFoundException is thrown to handle situations where the requested purchase order does not exist.
- Regarding the attribute OrderItems in Order_Detail, it is intentionally not set to be mandatory. This design choice allows the flexibility to leave the value empty initially in the assign OrderDetail and then easily append items in a subsequent loop.
- The final assignment in the loop calculates the TotalAmount for the purchase order using an expression:
OrderDetail.TotalAmount = OrderDetail.TotalAmount + (
  GetOrderWithItemsByOrderId.List.Current.OrderItem.Quantity *
  GetOrderWithItemsByOrderId.List.Current.OrderItem.Amount
)
Save data (Order_Save)
The primary objective of the Order_Save server action is to persist the changes specified within the OrderSave input parameter. This process entails validation, comparison with the current state (optional parameter OrderDetail), and ultimately, updating the database. The entire flow is segmented into three distinct processing blocks for clarity and comprehensibility.
Processing block 1: Data validation
The initial block focuses on the validation of the data contained in the OrderSave parameter.
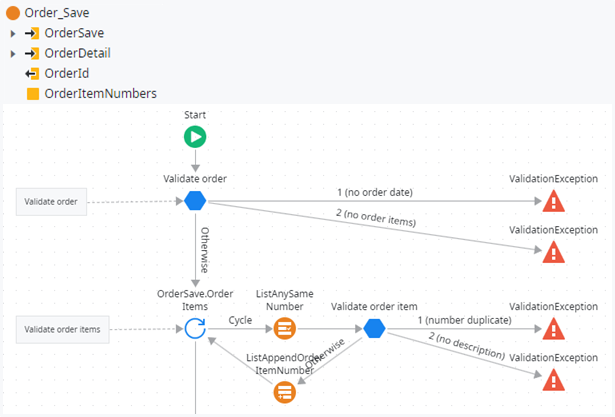
In OutSystems, data validation can efficiently be achieved using the Switch element to evaluate all possible invalid values and throw a ValidationException. When none of these checks match, the flow proceeds through the Otherwise branch.
- no order date
The system checks ifOrderSave.OrderDate = NullDate()to determine if there’s no order date specified. - no order items
Validation checks whetherOrderSave.OrderItems.Emptyis true, indicating that there are no order items provided.
Within the loop, each order item intended for saving undergoes thorough validation:
- number duplicate
Validation is carried out by examining ifListAnySameNumber.Resultis true, which utilizes the expressionValue = OrderSave.OrderItems.Current.Numberto identify a match in the local variable OrderItemNumbers of type Integer List. This variable is employed to keep track of numbers already in use. Successful validation appends all numbers from validated order items to this list using ListAppendOrderItemNumber. - no description
The system checks ifTrim(OrderSave.OrderItems.Current.Description) = "", verifying the presence of a description for each order item.
Processing block 2: Creating or Updating purchase order
Within the second block of the Order_Save server action, the system determines whether to create a new purchase order or update an existing one, based on the condition OrderDetail.OrderId = NullTextIdentifier().

- In the case of an update operation, the server action calls GetOrderForUpdate. This function serves to set a database lock specifically for the affected Order record. The lock’s purpose is to prevent concurrent writes to the same purchase order, ensuring data consistency.
- The assign step Update Attributes is responsible for only overwriting values that require modification and leaves all other attributes of the entity unchanged. This selective approach avoids data loss when the UpdateOrder action writes the changes back to the database.
- Before both branches of the operation converge in the next processing block, the system performs the essential task of assigning the newly created or recently updated order identifier to the OrderId output parameter. This step ensures that following steps reference the correct purchase order and the caller receives the identifier as part of the server action’s output.
Processing block 3: Synchronization of order items
Within the final block of the Order_Save server action, a series of steps are executed to handle order items. These steps involve iterating through the current order items in OrderDetail (representing the loaded database state, which may be empty for new purchase orders) and searching for corresponding items in OrderSave (representing the state to be saved). The related database actions taken to synchronize are contingent on the comparison results.
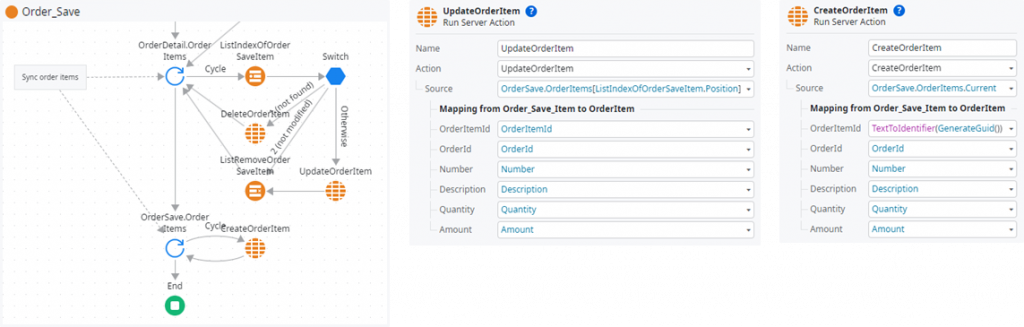
The process initiates by iterating through all current order items in OrderDetail. This step is essential to examine the existing state of order items:
- not found
The system checks if the same OrderItemId is not present in OrderSave anymore (determined byListIndexOfOrderSaveItem.Position = -1). If no match is found, this implies that the item should be deleted from the database, leading to the invocation of DeleteOrderItem. - not modified
If the state of the order item in OrderSave is identical to its counterpart in OrderDetail (according to the following expression), it signifies that no modifications have been made. In this case, the order item is removed from OrderSave to suppress further actions for this item.
OrderDetail.OrderItems.Current.Number =
  OrderSave.OrderItems[ListIndexOfOrderSaveItem.Position].Number and
OrderDetail.OrderItems.Current.Description =
  OrderSave.OrderItems[ListIndexOfOrderSaveItem.Position].Description and
OrderDetail.OrderItems.Current.Quantity =
  OrderSave.OrderItems[ListIndexOfOrderSaveItem.Position].Quantity and
OrderDetail.OrderItems.Current.Amount =
OrderSave.OrderItems[ListIndexOfOrderSaveItem.Position].Amount- Otherwise
If this branch is reached, UpdateOrderItem is invoked to ensure that the modifications detected are accurately reflected in the database. The order item is also removed from OrderSave here as no further save action is required for this item.
Subsequently, the server action proceeds to loop through the remaining order items in OrderSave. These are items that were not present in the loaded database state but need to be created. For each of these items, the action CreateOrderItem is invoked to facilitate their creation in the database.
The next part of this article concentrates on the UI implementation and how to efficiently realize a popup dialog to edit order items:
Master-Detail data in OutSystems (2) UI
I hope the article was to your liking and would be pleased if you follow me on my social media accounts. In case you have any questions left open or have tips for me to improve, please contact me via Medium or my OutSystems profile.