

Leveraging AWS AppSync and websocket connections
It’s been a little while since I published my last article. I moved to a new home with my family and also had priorities in customer projects that were more time-critical. Time-critical communication is precisely what this article is about: Communication from client to server is no challenge using simple HTTP requests. However, it is a different story in the opposite direction.
What you need
If you want to follow up the content of this article on your own, you need:
- An Amazon Web Services account (free tier is sufficient for first year)
- An OutSystems 11 account (a free personal environment is sufficient) or access to an OutSystems Developer Cloud tenant
- OutSystems Service Studio or ODC Studio
- AWS AppSync Connector (available for free from the O11 or ODC Forge)
The challenge
In web applications, communication between client and server usually takes place via webservices (REST or SOAP). OutSystems uses so-called screen aggregates or data fetch actions to update information in the UI. In the background, these are simply REST webservices based on the HTTP protocol as well. HTTP is short for Hyper Text Transfer Protocol and, as its name indicates, was developed at the beginning of the web to allow HTML documents (Hyper Text Markup Language) and related resources like images to be transferred from the web server to the client. Therefore, it is designed as stateless, unidirectional communication:
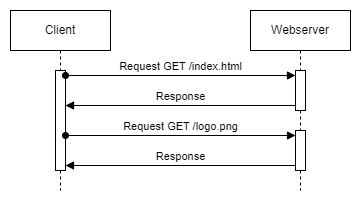
As shown in the diagram above, communication always starts with a request from the client and is then concluded with a response from the server. This fits in very well with the design of the web, in which servers offer their information and services at a publicly known address. Clients, on the other hand, are typically located behind a firewall and precisely should not be called from an outside party.
As long as the triggering event for an update always occurs on the client side, e.g. by clicking a button, this is sufficient. However, if the triggering event takes place on the server side, e.g. because a new message is to be delivered in a messaging system, the request would have to be made from the server to the client, which is not intended and supported.
Three approaches
There are reverse web communications on the internet, so how is it done?
Polling
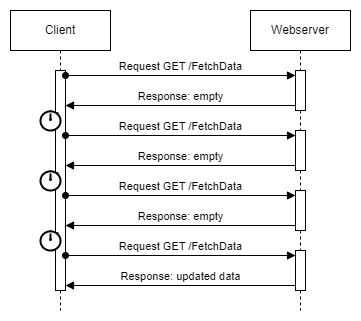
The simplest and probably most obvious solution is for the client to regularly check with the server whether new data is available. This process is called polling and can be implemented with a small JavaScript which calls the data fetch action periodically. The disadvantage of this approach is that the client requests data even when there is no new data available. This leads to an unnecessarily high load on the server and can only be counteracted by a longer polling interval. But this also means the time between availability of a data update and its arrival at the client lasts longer. Therefore, this solution is not suitable for scenarios that require real-time communication.
Long-lasting request / streaming
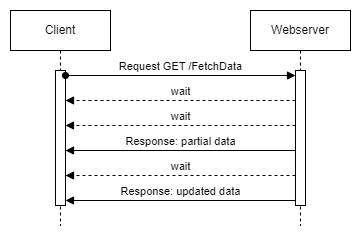
The issue with polling is that the connection between client and server is closed after each response. Wouldn’t it make sense if the connection could remain open to allow the server to send a response whenever new data is available? This method is known as long-lasting requests. Although there are timeouts for the HTTP connection within which the request must be completed, the transmission of a response with large amounts of data can certainly take longer. In addition, there is a wait status defined in the protocol, which the server can use to inform the client to wait a little longer for the result. So the client could make such a long-running request and the server needs to keep the connection open and periodically either send a wait status or “stream” the next data update. If the connection is interrupted, the client can simply initiate the next request. The disadvantage of this approach is that, by default, each browser can only send a limited number of simultaneous requests to the same server and a web server can only process a limited number of requests at a time. In order to not negatively affect the performance for other requests, separate web servers must be provided for such a solution. In addition, bidirectional communication is not possible within an open connection.
Websocket
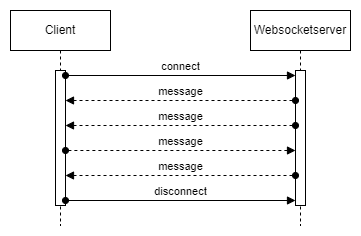
In scenarios where bidirectional real-time communication is essential, websocket connections are ideal. They are not based on the simple request/response principle described above, but work in a similar way to a telephone call: Although the client still establishes the connection to the server, it remains open until one of the two parties disconnects. During an open connection, both sides can send messages to the opposite partner. Despite transmission latency, this enables real-time communication. While there is definitely a need for one or more separate websocket servers in addition to the web server delivering the website, these servers can exclusively take care of maintaining the real-time connections without affecting the webserver(s).
The solution
Looks like websocket is the way to go, right?
If you ask me, all three approaches mentioned have their raison d’être:
- As polling is very easy to implement, it can be a cost-effective solution for a long polling interval or for short-term use with only a few simultaneous clients.
- Long-lasting requests are also suitable for a smaller number of simultaneous connections and, in contrast to websockets, work with normal HTTP webservers. Similar to polling, this solution can be realized with OutSystems, although holding the very long requests can be a bit tricky and the use of a custom code extension is advisable.
- Websockets overcome the disadvantages of the first two approaches and enable free bidirectional message exchange.
Unfortunately, you cannot implement a websocket server natively with OutSystems, so we need a little external help. But where do you get it from if we don’t have such a server?
In the cloud, of course! In one of my recent projects, I stumbled across API Gateway in the Amazon Web Services and noticed that it also supports websocket connections. Implementing a simple messaging system with corresponding logic in AWS Lambda shouldn’t be too difficult. For a classic Pub/Sub pattern, we would need the ability to receive and distribute messages. Obviously, this also includes managing subscribers. And maybe we should also allow subscribers to subscribe only to certain events.
This sounds like quite a lot of implementation work and not at all quick and easy with LowCode!
That’s right, we’re doing low-code and want to configure functionality where possible rather than writing a lot of textual code. This is where AWS AppSync steps on the scene. It is a managed service that allows developers to create GraphQL and Pub/Sub APIs to connect applications to multiple data sources and real-time events.
The heart of AppSync’s working principle is GraphQL. Unlike traditional REST APIs where the server defines the response structure, the Graph Query Language allows clients to specify exactly what data they need. This reduces over- and under-fetching of data. It uses a strong type system to define the capabilities of the API including types and structures of data that can be queried. Furthermore, GraphQL allows fetching multiple resources in a single request, which also minimizes the number of network requests necessary.
AWS AppSync
Let’s start configuring the websocket server in AWS AppSync:
- Log into your AWS console and navigate to the AppSync console. You can find this in the Services menu in category Front-end Web & Mobile or by typing AppSync in the search box.
- Please make sure you have selected the correct region in the top bar where you want to deploy the service before clicking on Create API.
- For our use case, select API type GraphQL API and in section GraphQL API Data Source choose Create a real-time API. Click Next.
- Enter a name for for your API that makes sense to you (e.g. OS-AWS-AppSync-Connector-Demo-API). Leave the checkbox Use private API features unchecked and click Next.
- AWS AppSync provides a simple Pub/Sub configuration that allows clients to subscribe to channels. As we want to configure a GraphQL API from scratch, please uncheck the checkbox and click Next.
- On the last page of the creation wizard you can review all settings and click Create API to finish the process.
Schema
For an AppSync API we need to define the schema in GraphQL. Beside the object types that define the structure of information to be processed, there are three special types to be included into the schema:
- Query to define how information can be queried by clients,
- Mutation to specify how information can be changed, and
- Subscription to describe the events a subscriber can hook on.
For our sample we will go with the following, very basic schema:
type Message {
  message: String
}

type Mutation {
  sendMessage(msg: String): Message!
}

type Query {
  dummy(param: String): String
}

type Subscription {
  subscribeToMessages: Message
    @aws_subscribe(mutations: ["sendMessage"])
}

schema {
  query: Query
  mutation: Mutation
  subscription: Subscription
}- First, we define the object type
Messagethat will represent a basic message for the real-time communication. It only has one field of typeStringto hold the message text. - Next is the special type
Mutationthat will allow clients of the API tosendMessageby passing aStringas parametermsg. The API will then return with the modifiedMessage. - The special type
Queryis mandatory in AppSync. As we only want to send a message and having this mutation reflected as a subscription, we just define a dummy here. - The interesting part of the schema is the special type
Subscriptionbecause this will allow our clients tosubscribeToMessagessent with the mutationsendMessageand being actively notified with theMessageobject transferred via the websocket connection. - At the end we tell AppSync which types to use as the
query,mutation, andsubscription.
Don’t forget to click Save Schema before you proceed.
Data sources
One advantage of GraphQL is that information can be obtained from multiple sources. The next step is to make these sources known to AppSync. In our case, we only have messages which we don’t want to query or store in a database, but only distribute via the subscription. So we don’t actually need a real data source in the background. For this purpose, there is the data source type NONE in AppSync. Let’s now create such a data source:
- Switch to Data sources in the navigation and click Create data source.
- Type in a name for the data source (e.g.
NoneDataSource), select Data source type NONE and click Create.
Resolvers
The connection between data fields within the schema and data sources is made via resolvers in AppSync. To add functionality to our sendMessage mutation, we need to attach a resolver to it:
- Navigate back to the Schema.
- Find the field
sendMessagein typeMutationand click on the Attach button in the Resolver column. - Select resolver type Unit resolver and under Additional setting select Velocity Template Language (VLT).
- As data source select the data source we created before (e.g.
NoneDataSource) and click Create. - Configure the request mapping template by copying the following snippet:
{
  "version": "2017-02-28",
  "payload": {
    "message": $util.toJson($context.arguments.msg)
  }
}- For the response mapping template use:
$util.toJson($context.result)- Click on Save.
Test AppSync API
🎉 Congratulations, we have now successfully configured our websocket server. To test this, we navigate to Queries in the menu and run the following query:
subscription MySubscription {
  subscribeToMessages {
    message
  }
}
In a second browser window, we now also open the Queries page of our AppSync API and run the following query:
mutation MyMutation {
  sendMessage(msg: "Hello World!") {
    message
  }
}
As a result, we see the message object returned by sendMessage:
{
  "data": {
    "sendMessage": {
      "message": "Hello World!"
    }
  }
}
As well as the message received in the first window with the started subscription:
{
  "data": {
    "subscribeToMessages": {
      "message": "Hello World!"
    }
  }
}
Connection parameters
For consuming the AppSync API we just created, we need some connection parameters which can be found on the Settings page in the menu. So please copy and save the following information for later:
- GraphQL endpoint is the URL of the REST endpoint to send GraphQL query and mutation requests.
- Real-time endpoint is the URL for the websocket connection to send subscription requests and receive subscription messages.
- API key is required for authentication against both endpoints.
OutSystems App
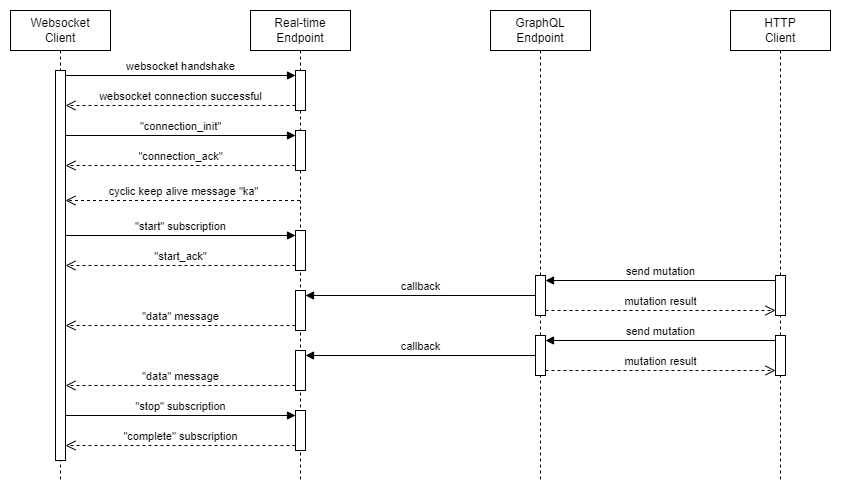
Now that we have the websocket server up and running, we want to consume it in an OutSystems application. As I wrote above, OutSystems is not supporting websocket natively. But one of the advantages I really like a lot about OutSystems is that you can extend the framework with custom code. Here we need some functionality for the client-side, so the language to go is JavaScript. If you read through the AppSync documentation, you find everything that needs to be implemented for doing real-time communication via websocket connection. This includes a handshake to initialize the connection, how to start and stop subscriptions and how to send and receive messages. The following diagram shows the whole communication process:
Luckily, you don’t have to implement the websocket consumer on your own and can just install my AWS AppSync Connector component from the forge for free:
The connector is also available for OutSystems Developer Cloud (ODC). Just search for AWS AppSync Connector by Telelink Business Services EAD and install it to your tenant.
Client implementation
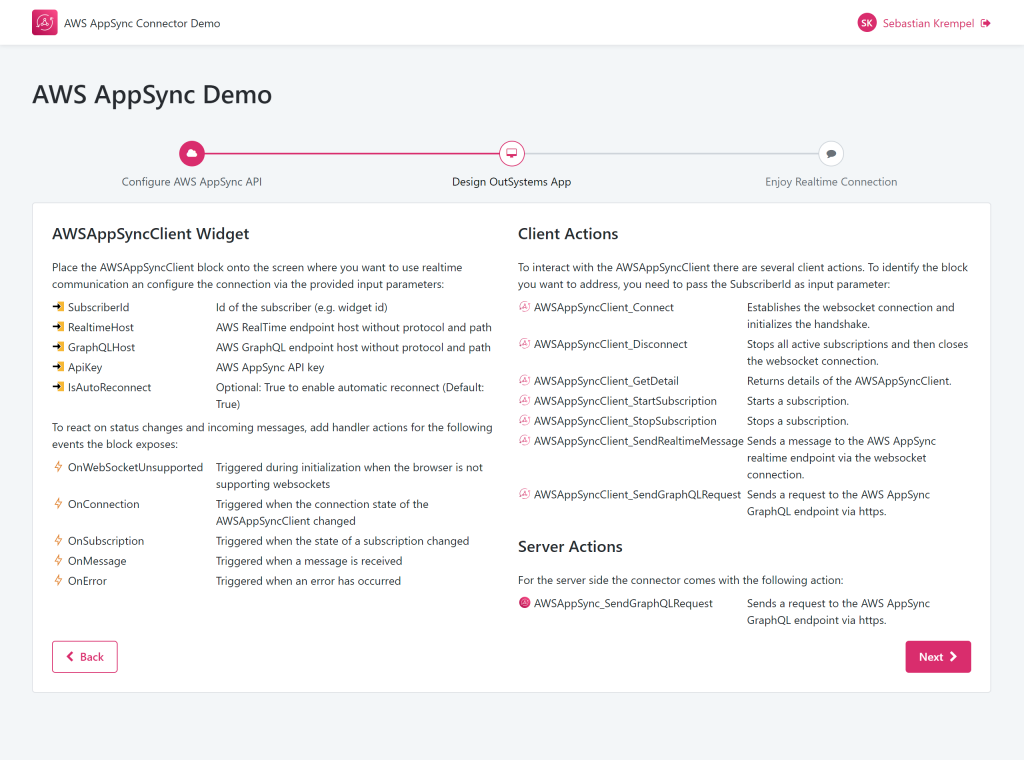
Can you remember the initial challenge? We want a message from the server to trigger some processing at the client side. This means we need event-driven programming for the client. In OutSystems, this can be achieved using events of web blocks. The connector contains a widget called AWSAppSyncClient that encapsulates the websocket connection and manages all active subscriptions for us. The widget is accompanied by client actions in order to invoke commands to the contained client implementation.
Of course, we need to tell the widget the connection parameters to the AppSync API. For this, there are the following input parameters:
- SubscriberId is mandatory to identify the instance (called the subscriber). This later needs to be passed to the client actions. You can use any text you wish as long as it’s unique. I recommend naming the widget and using the widgets id as SubscriberId.
- RealtimeHost must be set to the host name of the AWS RealTime endpoint without protocol (
wss://) and path (/graphql).
Format:[api-host].appsync-realtime-api.[region].amazonaws.com - GraphQLHost must be set to the host name of the AWS GraphQL endpoint without protocol (
https://) and path (/graphql).
Format:[api-host].appsync-api.[region].amazonaws.com - ApiKey is the AWS AppSync API key for authentication.
Additionally there is the optional input parameter
- IsAutoReconnect to enable automatic reconnect (
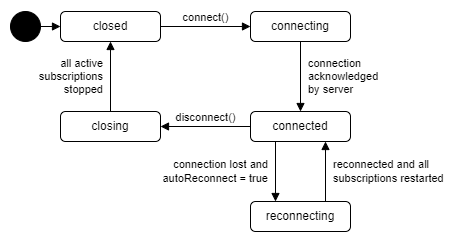
Trueby default). When this feature is enabled, the component is automatically reconnecting to the websocket when the connection is lost and also resubscribing to all subscriptions that were active.
If the browser is not supporting websocket, during its initialization the widget triggers the event
- OnWebSocketUnsupported which should be handled if real-time communication is to be used. Otherwise, the event can be ignored.
After the widgets initialization you can already send GraphQL requests to query or mutate data by using the client action
- AWSAppSyncClient_SendGraphQLRequest as it is using the GraphQL endpoint via HTTPS.
Hence the websocket connection is only required for subscriptions and receiving real-time messages, it is not established automatically. You can do so by using the client action
- AWSAppSyncClient_Connect to open the connection and initialize the handshake.
Whenever the connection state changes, the widget will trigger the event
- OnConnection with the new state being passed as text parameter:
After the connection is successfully established, you can subscribe und unsubscribe to the Subscriptions you defined in the AppSync API schema by using the following client actions:
- AWSAppSyncClient_StartSubscription starts new subscription based on the GraphQL query and variables you provide as input parameters.
- AWSAppSyncClient_StopSubscription stops the subscription identified by the SubscriptionId you provide as input parameters.
Whenever the state of a subscription changes, the widget triggers
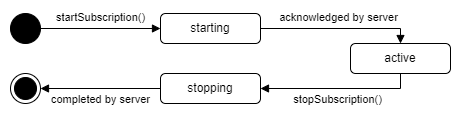
- OnSubscription with the SubscriptionId and the new state being passed as text parameters:
During one or multiple active subscription(s) the widget triggers the event
- OnMessage with the SubscriptionId and the received data as JSON text whenever a new message is received.
The last event that can be triggered by the widget is
- OnError which is passing over the source of the error (
appsyncorwebsocket) and additional details as JSON text.
As you may have noticed in the introduction to this article, currently AWS AppSync is only free of charge within the free tier for the first twelve months and only to a limited extent. Amazon charges based on the number of query and mutation requests, the number of real-time messages delivered and the connection time. Thus, for most people, it should be in their economic interest to terminate connections that are no longer required. The client action
- AWSAppSyncClient_Disconnect stops all active subscriptions and then closes the websocket connection.
At any given time, you can call the client action
- AWSAppSyncClient_GetDetail to check the current connection state, auto-reconnect setting and list of subscriptions.
The remaining client action
- AWSAppSyncClient_SendRealtimeMessage allows to send a custom message to the real-time endpoint via the websocket connection.
Server implementation
The still missing piece of the puzzle is the server side. After all, we want to actively send a message from the server to the client. As you have already experienced in section “Test AppSync API” of this article, we can push a message to subscribed clients by running a GraphQL mutation. For this purpose, the connector contains the server action
- AWSAppSync_SendGraphQLRequest which sends a request to the AWS AppSync GraphQL endpoint via HTTPS.
See everything in action
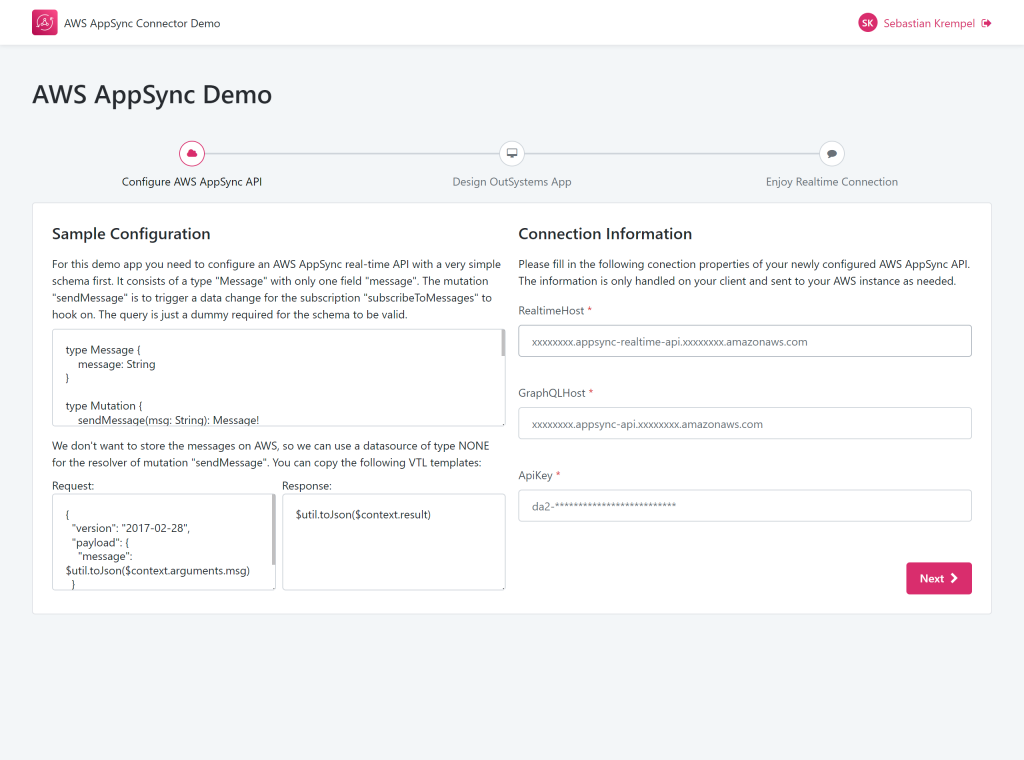
You have just learned everything you need to know to implement real-time communication with AWS AppSync in OutSystems. Maybe you’ve already built your first app while reading this? If not, you can download my demo app from the OutSystems forge and try it out with the AppSync API you set up above.
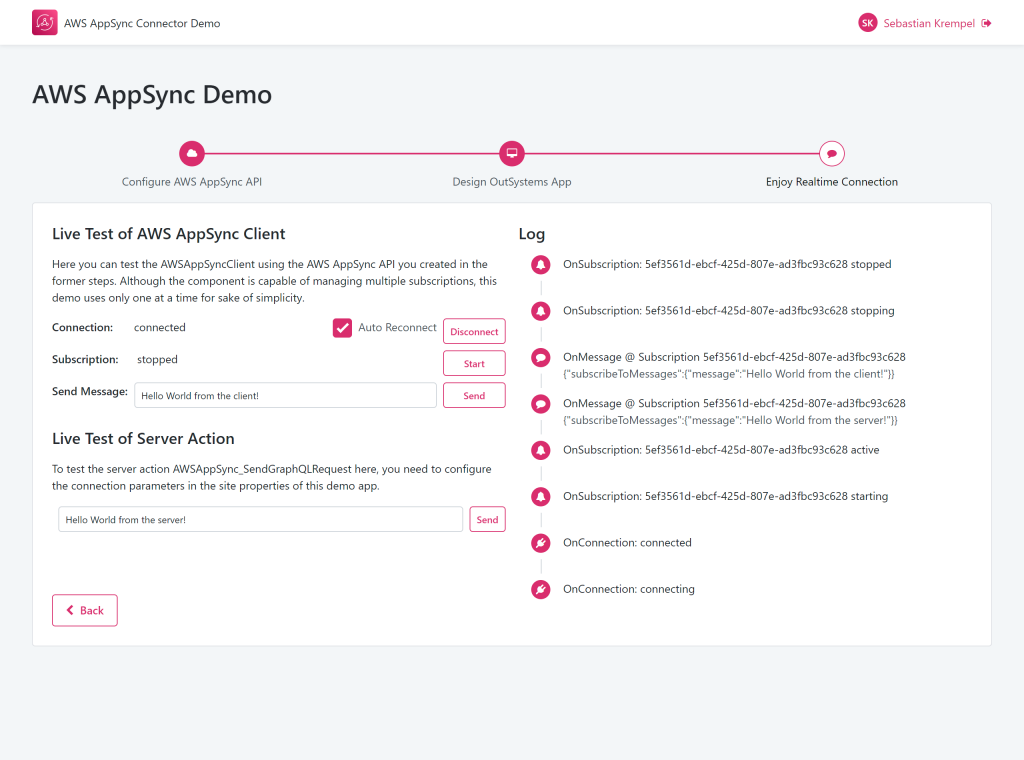
For O11 you can find the demo here:
You can find the ODC variant in your ODC portal by searching for “AWS AppSync Connector Demo” from Telelink Business Services EAD in the forge.
For this article I decided not to write a step-by-step guide on how to implement in OutSystems, but rather to describe the background for choosing the technology and an overview of how to use the AWS AppSync Connector. I hope this format is to your liking. I would love to hear your feedback and am curious whether and how you use the component in your projects.
If you liked the article, feel free to follow me on my social media accounts. In case you have any questions left open or have tips for me to improve, please contact me via Medium, LinkedIn or my OutSystems profile.